Chocolate covered strawberries feel fancy, but they’re surprisingly simple to make at home. With just a few ingredients and some easy decorating tricks, you can turn fresh berries into a gift-worthy dessert. They’re perfect for date nights, birthdays, holidays, or a sweet afternoon snack.
You don’t need special equipment, just patience and a good chocolate melt. Once you try them, you’ll wonder why you ever bought them from a shop.
What Makes This Recipe So Good
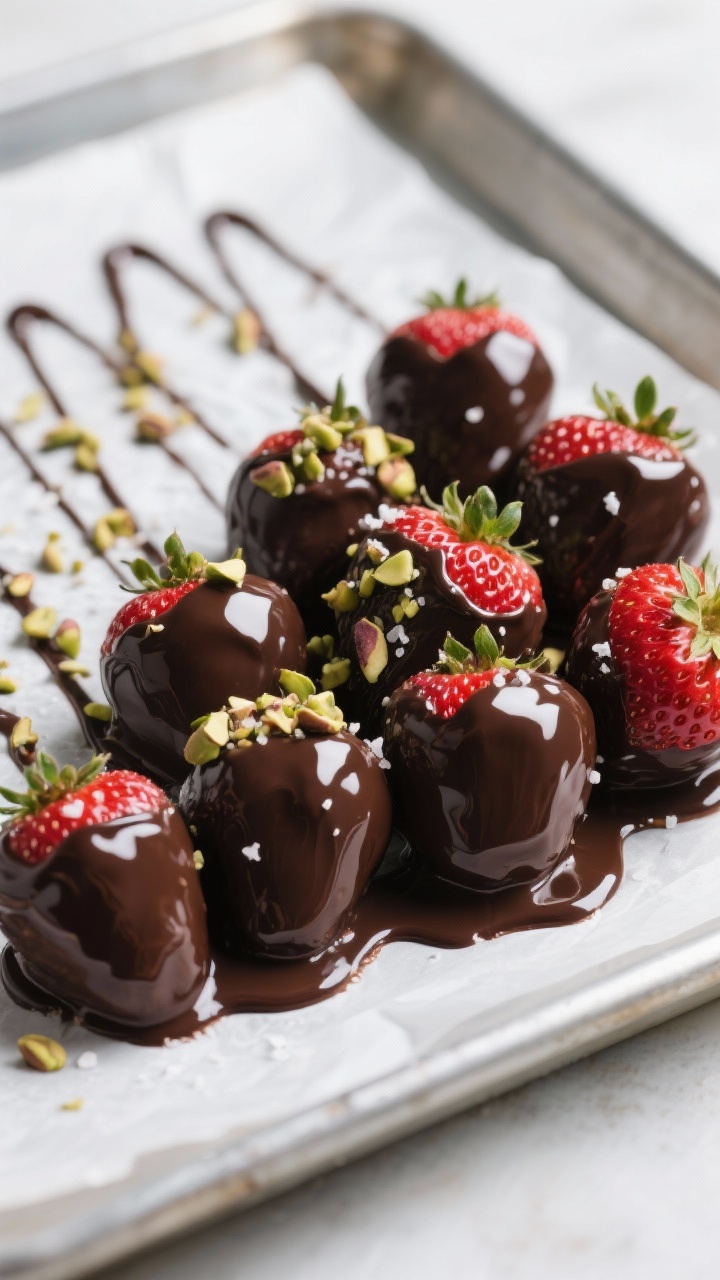
- Minimal effort, big impact: They look stunning with very little work. A few drizzles, a sprinkle of nuts, and you’ve got a showstopper.
- Customizable flavors: Choose dark, milk, or white chocolate, and dress them up with coconut, pistachios, or colorful sprinkles.
- Great for gifting: Box them up with parchment paper and a ribbon.
They feel special without being fussy.
- Fresh and not too heavy: You get sweet chocolate with bright, juicy fruit—just the right balance.
- Kid-friendly craft: Let kids add sprinkles or drizzle white chocolate. It’s an easy, fun kitchen activity.
Shopping List
- Fresh strawberries: 1 to 2 pounds, firm and ripe, with green tops attached
- Chocolate: 8–12 ounces of good-quality chocolate (dark, milk, or white). Chocolate wafers or bars melt best.
- Neutral oil or cocoa butter (optional): 1–2 teaspoons to thin the chocolate for smoother dipping
- Decorations (choose a few):
- White chocolate for drizzling
- Crushed nuts (pistachios, almonds, hazelnuts, pecans)
- Shredded coconut
- Sprinkles or sanding sugar
- Mini chocolate chips
- Freeze-dried raspberry or strawberry powder
- Sea salt flakes (optional): For a sweet-salty finish
- Parchment paper: For lining the tray
Step-by-Step Instructions

- Choose and prep your strawberries: Pick firm berries with bright green tops.
Rinse gently, then pat very dry. Let them air-dry completely. Any water will make the chocolate seize or slide off.
- Line a tray: Place parchment paper on a baking sheet or large plate.
This prevents sticking and makes cleanup easy.
- Chop the chocolate: Cut the chocolate into small, even pieces for smoother melting. Set 1–2 ounces aside if you plan to drizzle with a different chocolate.
- Melt the chocolate: Use a microwave-safe bowl. Heat in 20–30 second bursts, stirring well between each.
Stop when mostly melted, then stir until smooth. If needed, add 1 teaspoon neutral oil to thin. Alternatively, use a double boiler over low heat, stirring constantly.
- Test the consistency: Dip a spoon and let the chocolate drip.
It should flow smoothly and coat evenly. If too thick, add a few drops of oil and stir.
- Dip the strawberries: Hold each berry by the green leaves or skewer the top. Dip and twist to coat, letting excess drip back into the bowl.
Gently scrape the bottom on the bowl’s edge to prevent a large “foot.” Place on the parchment.
- Add decorations right away: While the chocolate is still wet, sprinkle nuts, coconut, sprinkles, or sea salt over the berries you want decorated. For a clean look, leave some plain.
- Create a drizzle: Melt the reserved white or contrasting chocolate. Use a spoon or small piping bag to quickly drizzle thin lines over set or semi-set berries for a bakery finish.
- Let them set: Leave at room temperature for 30–45 minutes, or refrigerate for 15–20 minutes until firm.
Avoid over-chilling to prevent condensation later.
- Plate and serve: Transfer to a platter or gift box lined with parchment. Enjoy the same day for best texture and shine.
Storage Instructions
- Short-term: Store in a single layer in an airtight container lined with paper towels, uncovered or loosely covered, in the fridge for up to 24–36 hours.
- Avoid moisture: Condensation can cause chocolate to bloom or look streaky. If possible, store in a cool, dry spot and refrigerate only if necessary.
- Serving tip: Let strawberries sit at room temperature for 10–15 minutes before serving to soften the chocolate slightly and reduce chill.
- Do not freeze: Freezing changes the texture of the berries, making them mushy when thawed.
Health Benefits
- Vitamin C boost: Strawberries are rich in vitamin C, which supports immune health and skin vitality.
- Antioxidants: Dark chocolate (70% or higher) offers flavonoids that may support heart health.
- Fiber and fruit: You’re getting real fruit with natural sweetness and fiber, making this a lighter dessert option.
- Portion-friendly: Each berry is a built-in portion, so it’s easier to enjoy a treat without overdoing it.
Common Mistakes to Avoid
- Wet berries: Any moisture prevents chocolate from sticking.
Dry thoroughly, including the crevices near the leaves.
- Overheating chocolate: Burned chocolate turns grainy. Heat gently and stir often. Stop microwaving while some chunks remain and let residual heat finish the melt.
- Using chocolate chips only: Chips contain stabilizers and may not melt as smoothly.
Use couverture, melting wafers, or chopped bars for best results.
- Thick coatings: Too much chocolate can crack when set. Let excess drip and lightly scrape the bottom edge.
- Adding toppings too late: Sprinkles and nuts won’t stick once the chocolate starts to set. Decorate right after dipping.
- Refrigerating for hours uncovered: This invites condensation.
Chill briefly to set, then store properly.
Variations You Can Try
- Two-tone drizzle: Dip in dark chocolate, then drizzle with white chocolate for contrast.
- Nutty crunch: Roll the bottom half in finely chopped pistachios or hazelnuts for color and texture.
- Cookies and cream: Crumble chocolate sandwich cookies and sprinkle over milk chocolate-covered berries.
- Berry-on-berry: Dust white chocolate-dipped strawberries with freeze-dried raspberry powder.
- Salted caramel stripe: Drizzle with caramel sauce and finish with a pinch of flaky sea salt.
- Coconut snow: Dip in dark chocolate and roll in shredded coconut for a tropical twist.
- Gold shimmer: After setting, brush lightly with edible gold dust for a special-occasion look.
FAQ
Do I need to temper the chocolate?
Tempering gives the best snap and shine, but it’s not required for home treats. Using good melting wafers or chocolate bars and letting the berries set at room temperature will still look great. If you want a glossy, professional finish, tempering is a nice upgrade.
Can I use frozen strawberries?
No.
Frozen strawberries release water as they thaw, which prevents the chocolate from adhering and makes a mess. Fresh, firm berries are essential.
How far in advance can I make them?
They’re best the same day, but you can make them 12–24 hours ahead. Store in a single layer in the fridge, loosely covered, and bring to room temperature for a few minutes before serving.
What’s the best chocolate to use?
Use high-quality chocolate bars or melting wafers.
Avoid low-quality chips if possible, as they’re formulated to hold shape and don’t melt as smoothly. A 55–70% dark chocolate is a great all-purpose choice.
Why is my chocolate streaky or dull?
This can be from condensation or overheated chocolate. Let berries dry completely, avoid drastic temperature changes, and melt chocolate gently.
If you temper the chocolate, you’ll get a shinier finish.
How do I make neat drizzles?
Transfer melted chocolate to a zip-top bag and snip a tiny corner. Squeeze thin lines back and forth quickly. Practice on parchment first if you like.
Can I make them dairy-free?
Yes.
Use dairy-free dark chocolate or a vegan white chocolate alternative. Check labels to confirm no milk ingredients.
Final Thoughts
Decorated chocolate covered strawberries are the kind of treat that looks impressive without the stress. With a little care—dry berries, gently melted chocolate, and quick decorating—you’ll get glossy, delicious results every time.
Mix and match toppings to fit the occasion, and don’t overthink it. Simple, fresh, and elegant often tastes the best. Enjoy your batch and share if you’re feeling generous.