Ever bitten into a sourdough loaf that crackles as you slice it and wondered, “Why can’t my bread ever taste like this?” I’ve been there. The kind of bread that’s crispy on the outside, soft and airy on the inside, and bursting with flavor feels like a magic trick, but I promise—it’s actually science, patience, and a little love.
After countless attempts (and a few slightly tragic loaves), I perfected this easy artisan sourdough recipe. It’s approachable for beginners yet authentic enough to impress anyone. If you’ve ever wanted that bakery-quality sourdough at home without stressing over complicated steps, keep reading. Your taste buds will thank you.
Why Artisan Sourdough Bread Is Worth Making
Before we get flour all over the counter, let’s talk about why artisan sourdough is so special.
- Natural fermentation: The tangy flavor comes from a live sourdough starter, not mysterious additives.
- Crispy crust & soft center: That contrast makes every bite satisfying.
- Longer shelf life: Sourdough naturally resists spoilage, so it lasts longer than ordinary bread.
- Digestive benefits: The fermentation process can make the bread easier on the stomach.
Ever wondered why sourdough tastes so complex? It’s all about the wild yeast and lactobacilli working together. It’s like a little science party happening in your dough. 🙂
Ingredients You’ll Need
This recipe makes one beautiful artisan loaf.
- 1 cup (240g) active sourdough starter
- 1 ½ cups (360ml) water, lukewarm
- 4 cups (480g) all-purpose flour
- 2 tsp salt
Optional Add-ins: Seeds, herbs, or roasted garlic for a flavor twist.
Pro Tip: Your starter should be bubbly and active—if it sinks or smells weird, give it a feed first. Think of it like waking up a cranky but lovable roommate.
Step 1: Mix and Autolyse
In a large bowl, combine the flour and water, leaving the salt out for now. Mix until there’s no dry flour left, then let it rest for 30–60 minutes.
This is called autolyse, and it’s basically giving the flour time to absorb water. The dough relaxes, gluten forms naturally, and you get a softer, more extensible loaf.
Rhetorical Question: Ever wondered why skipping this step makes bread tougher? Science, my friend. Science.
Step 2: Add Starter and Salt
Now, stir in your active starter and salt. Use gentle folding motions to integrate everything. At this point, your dough should be sticky, stretchy, and a little forgiving.
Pro Tip: Don’t panic if it feels wet—artisan sourdough is supposed to be a bit sticky. Think of it like working with doughy clay instead of concrete.
Step 3: Bulk Fermentation
Cover your bowl with a towel or plastic wrap and let the dough rise at room temperature for 4–6 hours, performing a stretch and fold every 30–60 minutes for the first 2 hours.
How to Stretch and Fold
- Wet your hand to prevent sticking.
- Grab one side of the dough, stretch it upwards, and fold it over.
- Rotate the bowl and repeat 3–4 times.
This technique strengthens the gluten and traps air, giving you that signature airy crumb.
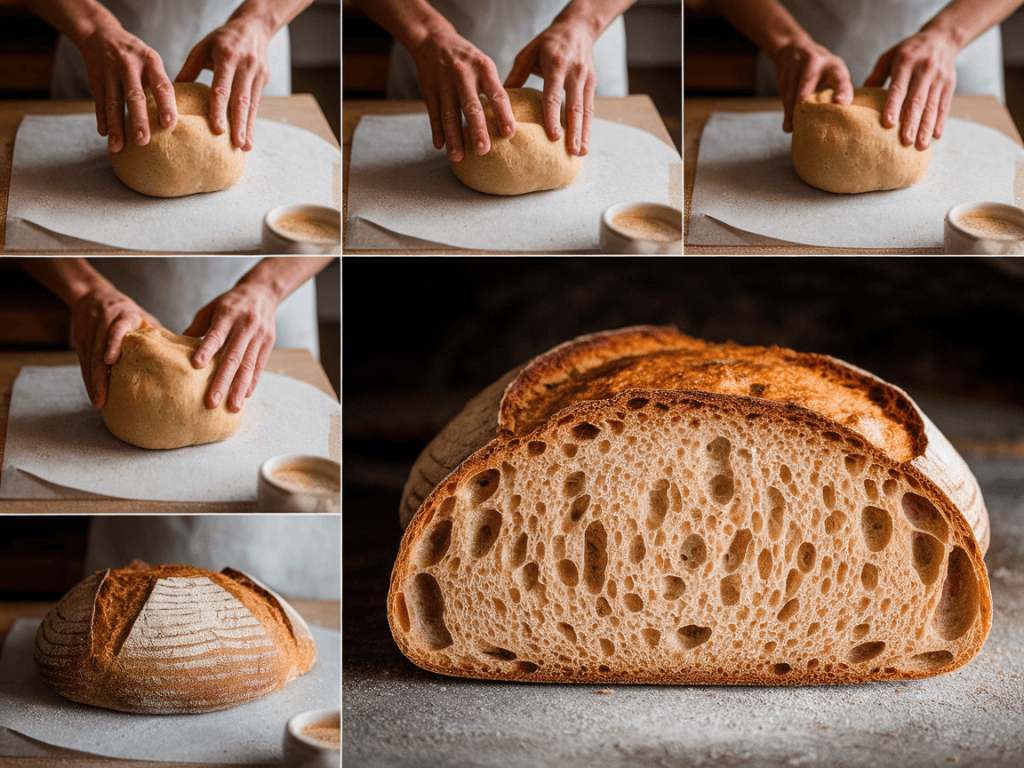
Step 4: Shape the Dough
Turn your dough onto a floured surface. Shape it into a tight round or oval loaf, being gentle so you don’t deflate all the air.
Optional: Sprinkle flour on top for a rustic look.
Pro Tip: If your dough is extra sticky, a bench scraper is your best friend. Seriously, it saves you from sticky-dough-induced frustration.
Step 5: Proof the Loaf
Place the shaped dough in a proofing basket or a bowl lined with a floured towel. Cover and let it rise for 2–3 hours at room temperature, or overnight in the fridge for more flavor.
Ever wondered why cold proofing is so popular? Slow fermentation develops deeper flavors and makes slicing easier without crushing the airy structure.
Step 6: Preheat Your Oven
Preheat your oven to 475°F (245°C). Place a Dutch oven or heavy pot inside to heat up. The hot pot will trap steam, which is key for a crispy crust.
FYI: I’ve baked without a Dutch oven before—fine, but the crust won’t have that signature crackle. Worth the extra step.
Step 7: Score and Bake
Carefully transfer your dough to the hot pot. Using a sharp knife or lame, make a 1–2 inch slash on the top. This allows the bread to expand and gives that beautiful artisan look.
Bake covered for 20 minutes, then uncover and bake another 20–25 minutes until the crust is deep golden brown.
Pro Tip: The bread should sound hollow when tapped on the bottom—this is your cue that it’s perfectly baked.
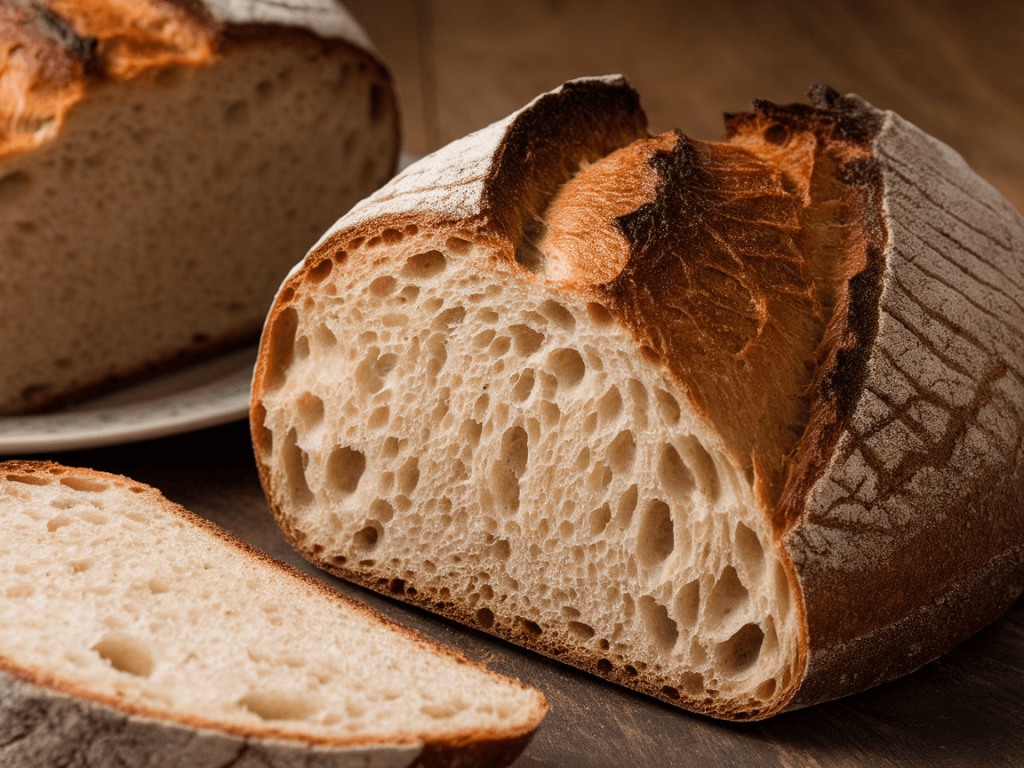
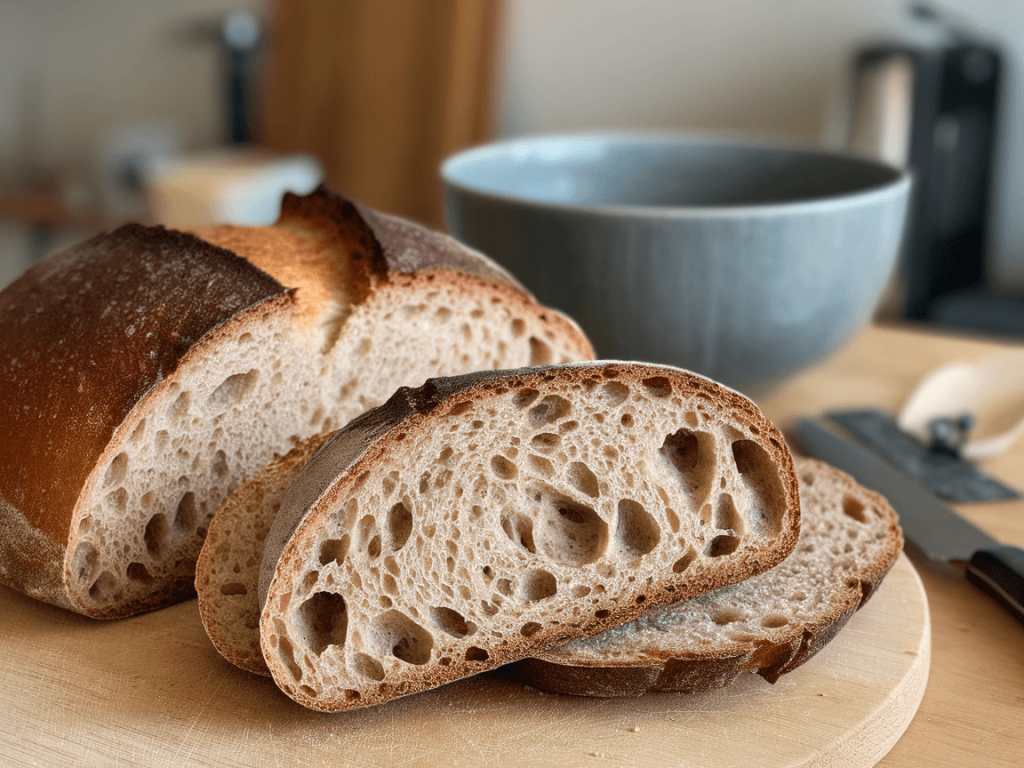
Step 8: Cool Before Slicing
Let your loaf cool completely on a wire rack before slicing. I know it’s tempting to cut it immediately, but trust me—the crumb sets during cooling. Slicing too soon? You get a gummy mess. Been there, done that, don’t recommend.
Tips for the Perfect Artisan Sourdough
- Use a mature starter: Active starter = airy, flavorful bread.
- Embrace sticky dough: High hydration is key to soft crumb.
- Stretch and fold: Strengthens gluten for the perfect texture.
- Cold fermentation optional: Adds flavor and makes dough easier to handle.
- Use steam: Creates that crispy, crunchy crust.
IMO, these steps aren’t just “rules,” they’re your roadmap to bakery-level bread at home.
Flavor Variations
- Herb & Garlic Sourdough: Add rosemary, thyme, or roasted garlic during mixing.
- Seeded Sourdough: Fold in sunflower, pumpkin, or sesame seeds for crunch.
- Olive & Sundried Tomato: Stir in chopped olives and tomatoes for a Mediterranean twist.
Rhetorical Question: Isn’t it amazing how a basic dough transforms with just a few extra ingredients?
Storing Your Sourdough Bread
- Room Temperature: Wrap in a clean kitchen towel; lasts 2–3 days.
- Freezing: Slice first, then freeze in a zip-top bag for up to 3 months.
- Reheating: Warm slices in the oven at 350°F for 5–7 minutes to refresh crust.
Pro Tip: Freezing slices individually is a lifesaver. Pop one in the toaster for a quick, fresh-bread experience.
Common Mistakes and How to Avoid Them
- Starter isn’t active: Feed it 4–8 hours before baking.
- Under or over proofing: Dough should rise but not collapse.
- Skipping steam: Crust won’t be crispy.
- Slicing too early: Leads to gummy crumb.
Honestly, sourdough is forgiving if you respect fermentation times. Think of it like gardening—the more patience you have, the better the results.
Why Making Artisan Sourdough Is Worth It
- Homemade bakery quality: Impress your friends without leaving your kitchen.
- Healthier: No preservatives, additives, or artificial flavors.
- Therapeutic: Watching dough transform is strangely satisfying.
- Customizable: Play with flavors, seeds, and shapes.
FYI, baking sourdough is my favorite form of self-care. There’s nothing like kneading dough while your favorite playlist is on and knowing delicious bread is coming soon. 🙂
Serving Suggestions
- Breakfast: Toast with butter, jam, or avocado.
- Lunch: Sandwich base for meats, cheeses, or veggies.
- Dinner: Serve with soup or a hearty stew.
- Snack: With olive oil, balsamic, and a pinch of salt.
IMO, sourdough elevates every meal—suddenly, even plain butter feels gourmet.
FAQ About Artisan Sourdough
Q: Can I make it with whole wheat flour?
A: Yes! Replace half the all-purpose flour with whole wheat for a nutty, wholesome loaf.
Q: How do I know if my starter is ready?
A: It should double in size within 4–8 hours and be bubbly with a slightly tangy aroma.
Q: Can I use a baking stone instead of a Dutch oven?
A: Absolutely! Add a tray of water for steam to get a crispy crust.
Q: How long does sourdough last?
A: Properly stored at room temp, 2–3 days, frozen, up to 3 months.
Final Thoughts
Making artisan sourdough bread at home isn’t as scary as it sounds. With a good starter, patience, and basic techniques, you can enjoy crispy crust, soft center, and irresistible flavor every time.
Once you try this recipe, you’ll understand why sourdough is more than just bread—it’s a craft, a ritual, and honestly, a little slice of happiness. So grab your flour, feed your starter, and get baking. Trust me, your kitchen will smell amazing, and your taste buds will do a happy dance.