If you love creamy desserts that come together quickly with zero fuss, these no-bake Oreo cheesecake cups are your new go-to. They’re rich, velvety, and loaded with Oreo crunch in every bite. No oven, no water bath, no stress—just a handful of ingredients and a fridge.
Make them for parties, weeknights, or whenever the sweet tooth hits. They look impressive, taste amazing, and take very little effort.
What Makes This Special
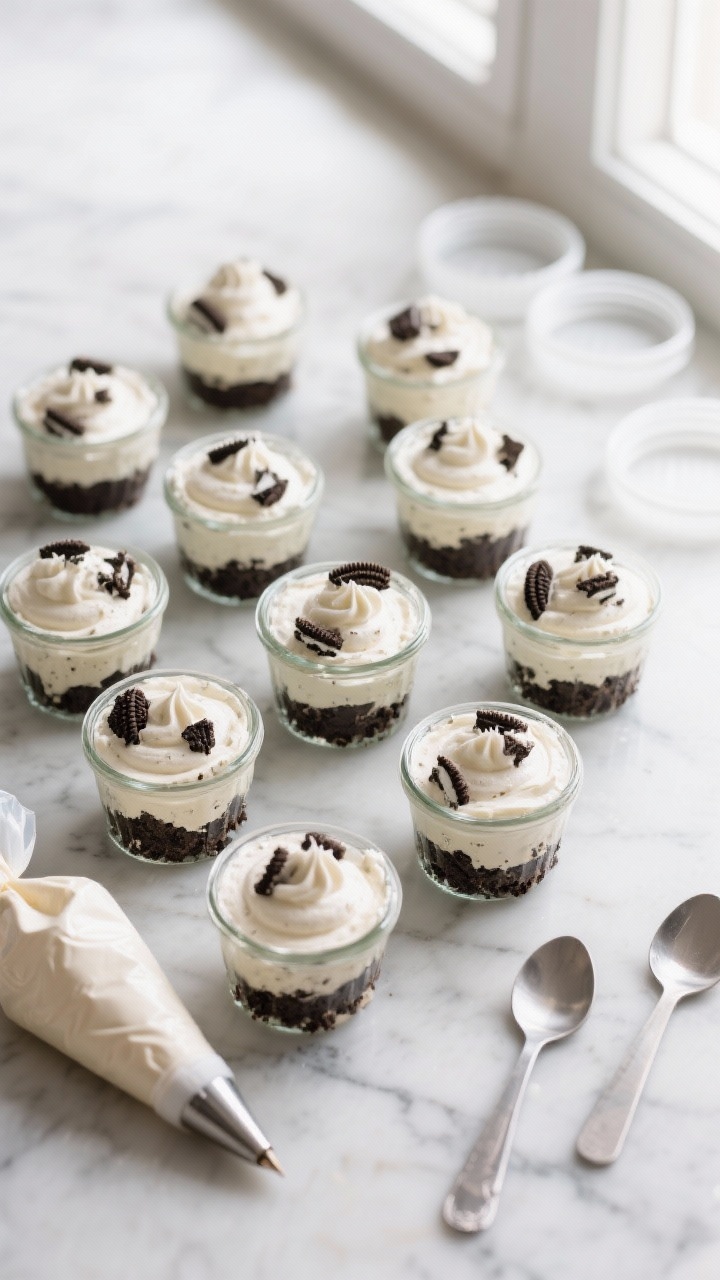
These cheesecake cups strike the perfect balance of creamy and crunchy. The Oreo crust at the bottom adds texture, while the smooth cheesecake filling stays light thanks to whipped cream.
They’re portioned into cups, so serving is easy and mess-free. Best of all, the recipe is forgiving—no fancy techniques, no fear of cracks or curdling, and no waiting on the oven.
What You’ll Need
- Oreos: About 24–28 cookies, divided (some for the crust, some for the filling, plus a few for garnish).
- Unsalted butter: 4 tablespoons (56 g), melted, to bind the crust.
- Cream cheese: 16 ounces (450 g), full-fat, softened.
- Powdered sugar: 3/4 cup (90 g), for smooth sweetness.
- Vanilla extract: 1 1/2 teaspoons.
- Heavy whipping cream: 1 cup (240 ml), cold.
- Pinch of salt: Optional, to balance the sweetness.
- Optional finishers: Whipped cream, mini Oreos, or chocolate shavings.
- Containers: 8–10 small cups, jars, or ramekins (4–6 oz each).
Step-by-Step Instructions
- Prep your cups: Set out 8–10 small serving cups. Clear some space in your fridge for chilling later.
- Make the Oreo crust: Add 14–16 Oreos to a food processor and pulse into fine crumbs.
Stir in melted butter until it looks like damp sand.
- Press the crust: Spoon 1–2 tablespoons of the crumbs into each cup. Press down firmly with the back of a spoon or a small glass to pack it. Tip: A tightly packed base holds together better.
- Chill the base: Pop the cups into the fridge for 10–15 minutes while you make the filling. This helps the crust set.
- Beat the cream cheese: In a large bowl, beat softened cream cheese on medium speed until smooth and fluffy, about 1–2 minutes.
No lumps!
- Sweeten and flavor: Add powdered sugar, vanilla, and a pinch of salt. Beat until fully combined and silky, scraping the bowl as needed.
- Whip the cream: In a separate bowl, whip cold heavy cream to stiff peaks. You should see defined ridges that hold their shape.
- Fold it in: Gently fold the whipped cream into the cream cheese mixture with a spatula.
Keep it light and airy—don’t deflate it.
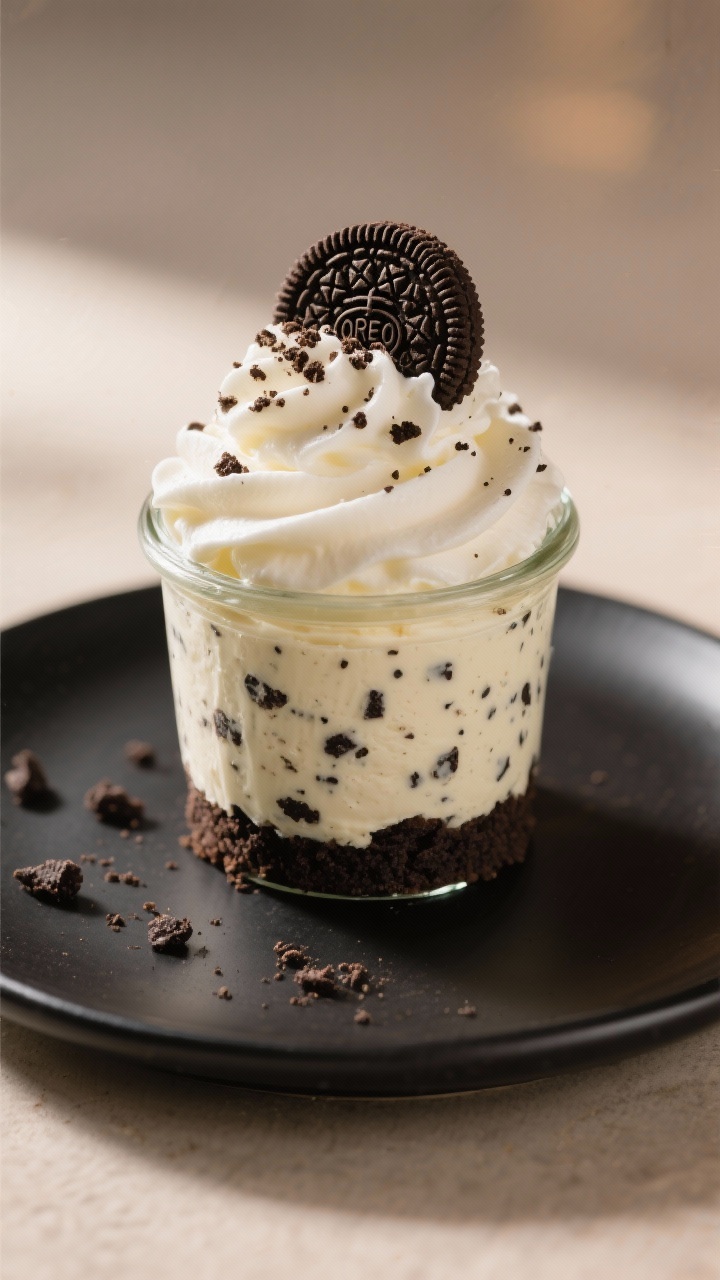
- Add Oreo bits: Crush 6–8 Oreos into small chunks (not dust) and fold into the filling. These add texture and that classic cookies-and-cream look.
- Fill the cups: Spoon or pipe the cheesecake filling over the chilled crusts, filling each cup almost to the top. Smooth the tops with the back of a spoon.
- Chill to set: Cover and refrigerate for at least 3–4 hours, or overnight for the firmest texture.
The wait is worth it.
- Garnish and serve: Top with a swirl of whipped cream, Oreo crumbs, or a mini Oreo. Serve chilled and enjoy.
How to Store
- Refrigerator: Keep covered in the fridge for up to 4 days. The texture stays creamy and the crust holds up well.
- Freezer: Freeze without whipped cream toppings for up to 2 months.
Thaw in the fridge for several hours before serving.
- Make-ahead tip: You can assemble the cups a day in advance. Add garnishes right before serving to keep them crisp.
Health Benefits
- Calcium and protein: Cream cheese and whipped cream provide calcium for bones and a bit of protein for satiety.
- Portion control: Individual cups help manage serving sizes, which can be helpful if you’re watching your intake.
- Lower stress cooking: No-bake desserts reduce time, heat, and cleanup—making homemade treats more manageable and enjoyable.
- Easy ingredient swaps: You can lighten it with reduced-fat cream cheese or Greek yogurt (see variations), making it fit a range of preferences.
What Not to Do
- Don’t use cold cream cheese: It won’t blend smoothly and can leave lumps. Let it soften at room temperature.
- Don’t skip chilling: The filling needs time to set.
Rushing this step leads to a slumpy, soft texture.
- Don’t overmix the whipped cream: Overmixing the filling can deflate the whipped cream and make the texture dense.
- Don’t soak the crust: Too much butter or pressing too lightly will give you a crumbly base that falls apart.
- Don’t add wet garnishes early: Fresh fruit or sauces can weep. Add them right before serving.
Recipe Variations
- Lightened-up version: Use Neufchâtel (1/3 less fat) cream cheese and swap half the whipped cream for 1/2 cup Greek yogurt. Expect a tangier flavor and slightly softer set.
- Mint Oreo: Add 1/4 teaspoon peppermint extract to the filling and use Mint Oreos.
Garnish with crushed peppermint or chocolate shavings.
- Mocha cookies and cream: Dissolve 1 teaspoon instant espresso in 1 teaspoon hot water. Cool, then beat into the cream cheese with the vanilla.
- Peanut butter swirl: Warm 1/4 cup creamy peanut butter until pourable. Swirl it into the filled cups before chilling.
Use Chocolate Oreos for extra depth.
- Gluten-free: Use gluten-free chocolate sandwich cookies and confirm all other ingredients are certified gluten-free.
- Berry topping: Spoon a quick berry compote (simmer berries with a little sugar and lemon, cool completely) over the set cups just before serving.
- Birthday cake style: Fold rainbow sprinkles into the filling and top with whipped cream and more sprinkles. Fun and festive.
FAQ
Can I make these without a food processor?
Yes. Place Oreos in a zip-top bag and crush with a rolling pin until fine.
Mix with melted butter in a bowl and proceed as usual.
Why is my filling runny?
It usually means the cream wasn’t whipped to stiff peaks or the cups didn’t chill long enough. Whip the cream until firm ridges form and chill for at least 3–4 hours.
Can I use store-bought whipped topping instead of whipping cream?
You can. Use about 2 cups of thawed whipped topping and fold it in gently.
The texture will be slightly sweeter and more stabilized.
Do I need to remove the cream from the Oreos for the crust?
No. The cream actually helps bind the crust and adds flavor. Just crush the cookies whole.
Can I make one big cheesecake instead of cups?
Yes.
Press the crust into an 8- or 9-inch springform pan. Chill for at least 6 hours, preferably overnight, before slicing.
How do I avoid lumps in the filling?
Start with room-temperature cream cheese and beat it until smooth before adding sugar. Scrape the bowl often, and fold in the whipped cream gently.
What’s the best way to pipe the filling neatly?
Spoon the filling into a large zip-top bag, snip a corner, and pipe into the cups.
It keeps the rims clean and looks polished.
Can I reduce the sugar?
Yes, reduce to 1/2 cup powdered sugar for a less sweet filling. Taste and adjust with a touch more vanilla if needed.
Are there dairy-free options?
Use dairy-free cream cheese, coconut whipped cream, and dairy-free chocolate sandwich cookies. The flavor will be slightly different but still delicious.
What size cups should I use?
Four- to six-ounce cups work best.
This size gives a satisfying portion without being too heavy.
In Conclusion
No-bake Oreo cheesecake cups deliver all the indulgence of classic cheesecake, minus the fuss. They’re simple to make, easy to serve, and endlessly customizable. With a crunchy Oreo base and a cloud-like filling, they’re a guaranteed crowd-pleaser.
Keep this recipe on hand for quick desserts, last-minute guests, or any time you want something creamy, easy, and irresistible.