Let’s be real—sometimes you just want a dessert that’s ridiculously easy, insanely creamy, and crowd-pleasing without breaking a sweat in the kitchen. That’s where Easy Banana Pudding with Cool Whip comes in. This dessert hits all the right notes: sweet, creamy, soft banana slices, crunchy Nilla wafers, and that magical whipped topping that makes everything feel fancy.
I first whipped this up for a last-minute family gathering. Honestly, I expected polite bites and maybe a few leftovers. Fast forward 20 minutes, and the dish was empty. No leftovers. Nada. Lesson learned: underestimate this dessert at your own peril.
Why You’ll Love This Banana Pudding
Classic Flavors, No-Fuss Prep
Here’s the secret: familiar flavors win every time. Bananas, pudding, and Nilla wafers? They basically shout comfort from the plate. Plus, using Cool Whip means zero stress whipping cream from scratch.
- Bananas add natural sweetness and soft, melt-in-your-mouth texture.
- Instant pudding makes it creamy and decadent without much effort.
- Nilla wafers add a satisfying crunch that keeps things interesting.
Ever wonder why desserts like this always get cleaned out first? It’s the perfect mix of creamy, crunchy, and sweet.
Texture That Makes You Smile
One of my favorite things about this dessert is the contrast of textures. The pudding is silky, bananas are soft, and wafers give a nice crunch. Every spoonful feels like a tiny party in your mouth. FYI, texture is everything in desserts.
Ingredients You’ll Need
The best part? Most of these ingredients are probably already in your pantry or fridge. Here’s what you’ll need for a classic, no-bake banana pudding:
For the Pudding
- 2 packages of instant vanilla pudding mix
- 3 cups cold milk
- 1 teaspoon vanilla extract
For the Creamy Layer
- 1 container of Cool Whip (about 8 oz)
- Optional: extra whipped cream for topping
For the Fruit
- 4–5 ripe bananas, sliced
- Optional: a splash of lemon juice to prevent browning
For the Crunch
- 1–2 cups Nilla wafers, lightly crushed
- Optional: extra wafers for garnish
Pro tip: ripe bananas are your friend here. Too green, and the dessert lacks sweetness. Too brown, and you get a mushy mess—been there, done that.
Step-By-Step Instructions
Alright, let’s get hands-on. I’ll walk you through making this like I’m right there beside you, whispering little tips to make it perfect.
Step 1: Make the Pudding
- In a large bowl, whisk the pudding mix with cold milk until smooth.
- Stir in vanilla extract for extra flavor.
- Let the pudding sit for a few minutes to thicken.
If you’re feeling adventurous, you can make homemade pudding. IMO, the instant version is just fine for speed and convenience—life’s too short for unnecessary stress.
Step 2: Slice the Bananas
- Slice bananas into 1/4-inch rounds.
- Toss with a little lemon juice if you want them to stay fresh-looking.
Quick tip: don’t slice too early. Bananas brown faster than you think, and no one wants a sad gray layer in their dessert.
Step 3: Crush the Nilla Wafers
- Lightly crush the wafers; aim for small chunks, not crumbs.
- Save some whole wafers for topping—it makes the dessert look way fancier.
Seriously, crushing cookies is therapeutic. Sometimes I do it just for fun.
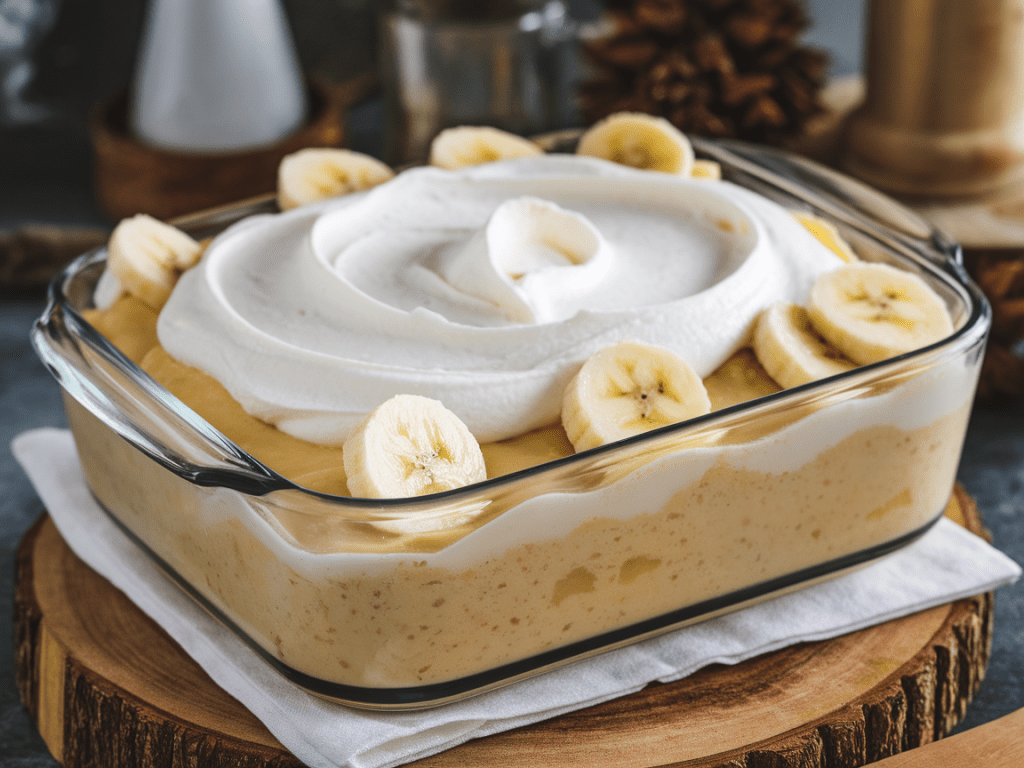
Step 4: Assemble the Dessert
Now comes the fun part—layering!
- Bottom layer: pudding
- Second layer: banana slices
- Third layer: crushed Nilla wafers
- Fourth layer: a dollop of Cool Whip
Repeat until your dish is full, finishing with Cool Whip on top. Sprinkle extra wafers or a little cinnamon for flair.
Ever noticed how dessert always tastes better when it looks good? Presentation counts.
Step 5: Chill Before Serving
- Cover the dish with plastic wrap and refrigerate for at least 2 hours, ideally overnight.
- Chilling lets the flavors meld and softens the wafers just enough without losing all the crunch.
FYI, patience here really pays off. Your future self will thank you when everyone asks for seconds.

Tips for the Best Banana Pudding
Even simple recipes have a few tricks to elevate them:
- Bananas matter: ripe but firm works best.
- Don’t over-crush wafers: some chunks = perfect texture.
- Chill adequately: pudding flavors intensify when cold.
- Assemble last-minute if possible: prevents bananas from browning.
- Use a clear dish: people eat with their eyes first, and layers look amazing.
Flavor Twists to Try
Want to mix things up a bit? Here are some fun variations I’ve tried (and loved):
Chocolate Banana Pudding
- Add a layer of chocolate pudding between vanilla layers.
- It’s basically chocolate heaven, but with bananas—don’t knock it until you try it.
Caramel Banana Delight
- Drizzle caramel sauce between layers for a richer dessert.
- Pairs beautifully with vanilla pudding and bananas.
Nutty Banana Pudding
- Sprinkle chopped pecans or walnuts between layers for crunch.
- Adds a nice nutty contrast to the creamy pudding.
Boozy Banana Pudding (for adults only)
- Mix in a splash of rum or bourbon into the pudding.
- Just enough to enhance flavor without overwhelming the bananas.
IMO, the classic version is perfect, but experimenting can be fun if you’re feeling adventurous.
Common Mistakes to Avoid
Even no-bake desserts can go sideways if you’re not careful. Avoid these:
- Using overripe bananas → mushy layers
- Crushing wafers too finely → lose that satisfying crunch
- Skipping chilling → pudding doesn’t set and flavors don’t meld
- Assembling too early → bananas brown and look sad
Think of this as a layer-by-layer meditation. Slow down, and it will pay off.
Serving Ideas
Presentation matters even for a simple dessert. Here’s how to wow without effort:
- Serve in individual glasses or jars for a cute, portable option.
- Top with whole wafers, banana slices, or extra Cool Whip.
- Sprinkle a touch of cinnamon or nutmeg for aroma and visual appeal.
Trust me, your friends will think you slaved for hours when it really took less than 20 minutes.
Storing Leftovers
- Refrigerate: keep in a covered container for 3–4 days.
- Avoid freezing: bananas and Cool Whip don’t handle it well.
- Top with wafers last-minute for crunch if storing separately.
Honestly, leftovers rarely survive past the first day in my house. FYI.

Why This Dessert is a Crowd-Pleaser
- Easy ingredients: most people already have them.
- Textural magic: creamy pudding, soft bananas, crunchy wafers.
- Customizable: chocolate, caramel, nuts, booze—you do you.
- Looks fancy but is effortless: perfect for potlucks, parties, or last-minute cravings.
If you’re still doubting the power of a simple dessert, this one will win you over.
Quick Tips for Stress-Free Dessert Making
- Layer right before serving if you want extra crunchy wafers.
- Use mason jars for portable, cute individual servings.
- Keep extra bananas on standby—you may need a backup layer.
- Chill overnight for best texture and flavor melding.
My Personal Take
I love this dessert because it’s a win-win. Minimal prep, zero baking, and maximum flavor. Every time I make it, I get the same result: happy faces, satisfied tummies, and sometimes the sneaky feeling of wanting it all for myself. 😏
Banana pudding with Cool Whip proves you don’t need a complex recipe to impress. It’s comfort food elevated, and honestly, who doesn’t need a little sweet comfort sometimes?